Bath DE*, Stowers JR*, Hörmann D, Poehlmann A, Dickson BJ, Straw AD (* equal contribution) (2014)
FlyMAD: Rapid thermogenetic control of neuronal activity in freely-walking Drosophila.Nature Methods. doi 10.1038/nmeth.2973
FlyMAD (Fly Mind Altering Device) is a system for targeting freely walking
flies (Drosophila) with lasers. This allows rapid thermo- and opto- genetic manipulation of the
fly nervous system in order to study neuronal function.
The scientific aspects of the publication are better summarised on
nature.com,
here,
on our laboratory website, or
in the video at the bottom of this post.
Briefly however; if one wishes to link function to specific neurons one could conceive of
two broad approaches. First, observe the firing of the neurons in
real time
using fluorescence or other microscopy techniques. Second, use genetic techniques to engineer organisms with
light or temperature sensitive proteins bound to specific neuronal classes such that by the application
of heat or light, activity in those neurons can be modulated.
Our system takes the second approach; our innovation being that by using real time computer vision and
control techniques we are able to track freely walking Drosophila and apply precise (sub 0.2mm)
opto- or thermogenetic stimulation to study the role of specific neurons in a diverse array of behaviours.
This blog post will cover a few of the technical and architectural decisions I made in the creation of the system.
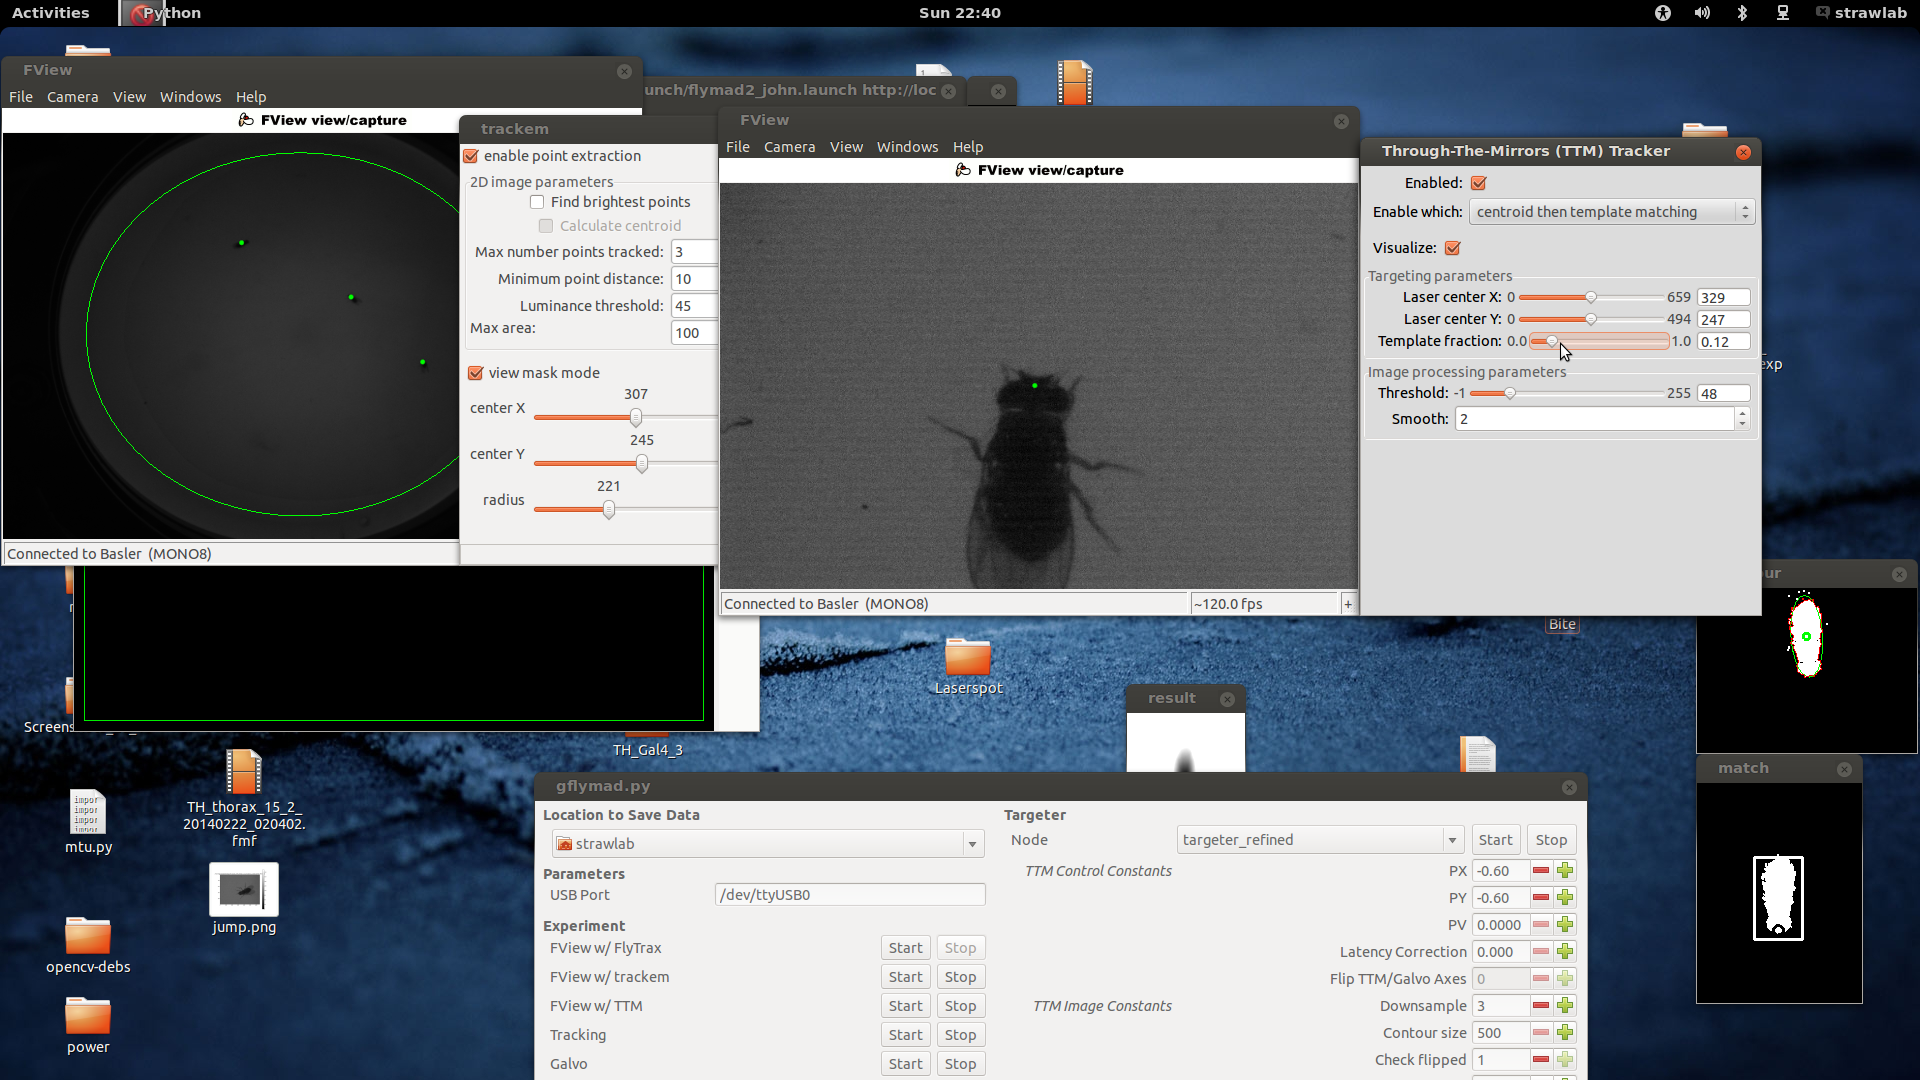
Perhaps it is easiest to start with a screenshot and schematic of the system in operation
Here one can see two windows showing images from the two tracking cameras, associated image processing configuration parameters
(and their results, at 120fps). In the center at the bottom is visible the ROS based experimental control UI.
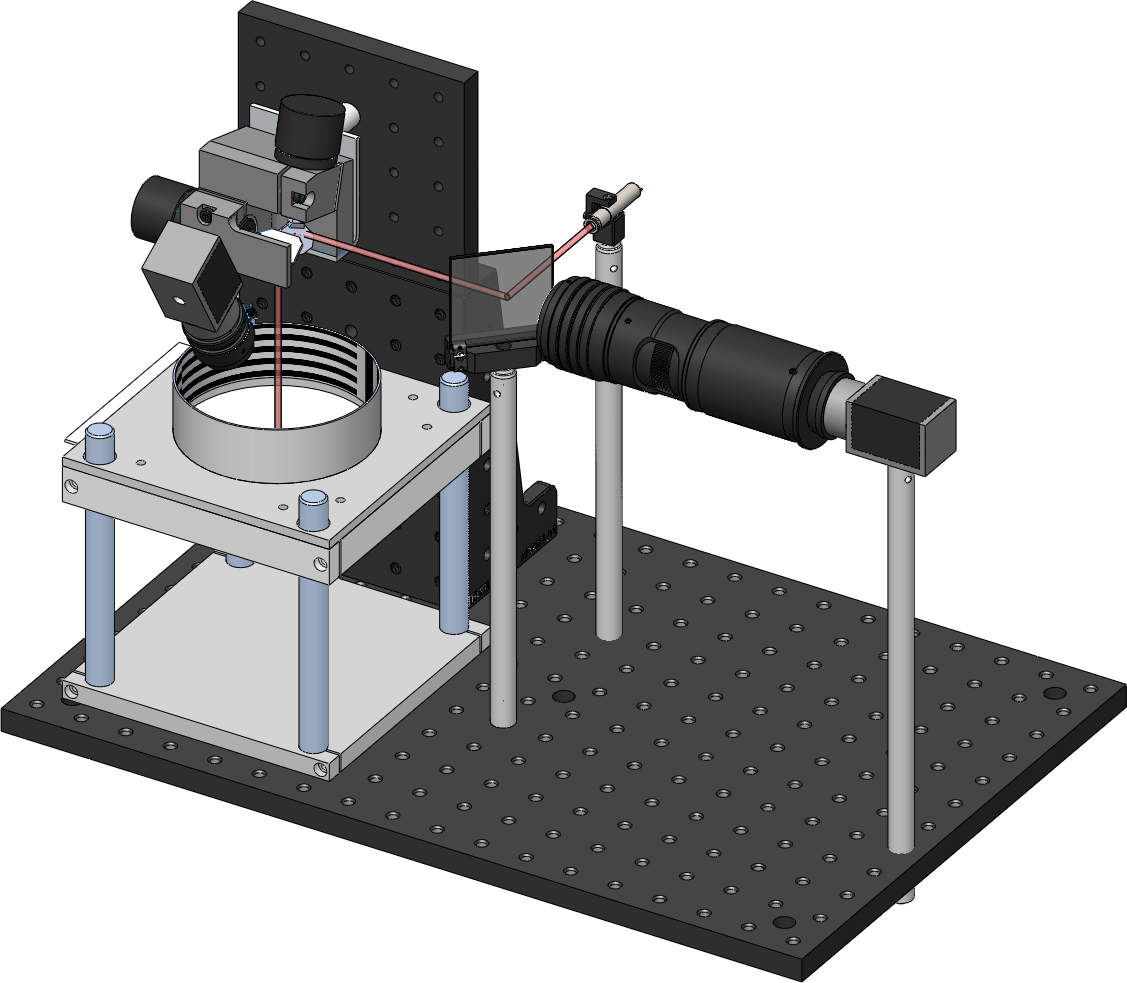
Schematically, the two cameras and lasers are arranged like the following
In this image you can also see the thorlabs 2D galvanometers (top left), and the dichroic mirror
which allows aligning the camera and laser on the same optical axis.
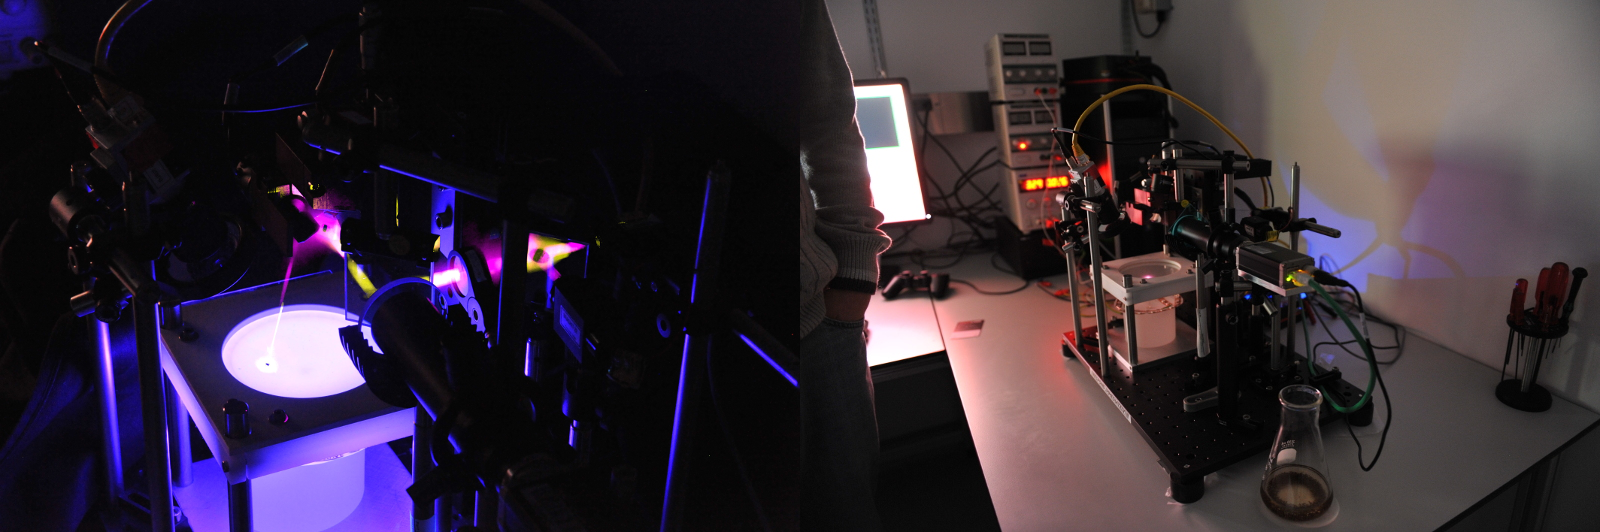
By pointing the laser at flies freely walking in the arena below, one can subsequently
deliver heat or light to specific body regions.
General Architecture
The system consists of hardware and software elements. A small microcontroller and
digital to analogue converter generate analog control signals to point the
2D galvanometers and to control laser power. The device communicates with the host
PC over a serial link. There are two cameras in the system; a wide camera for fly position
tracking, and a second high magnification camera for targeting specific regions of the fly.
This second camera is aligned with the laser beam, and its view can be pointed
anywhere in the arena by the galvanometers.
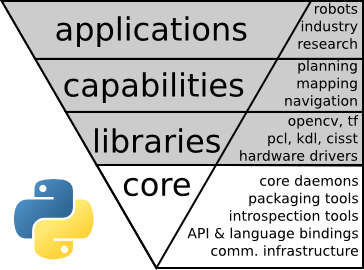
The software is conceptually three parts; image processing code, tracking and targeting code, and
experimental logic. All software elements communicate using robot operating
system (ROS) interprocess communication layer. The great majority of
code is written in python.
Robot Operating System (ROS)
ROS is a framework traditionally used for building
complex robotic systems. In particular it has a relatively good performance and
simple, strongly typed, inter-process-communication framework and serialization format.
Through its (pure) python interface one can build a complex system of multiple
processes who communicate (primarily) by publishing and subscribing to
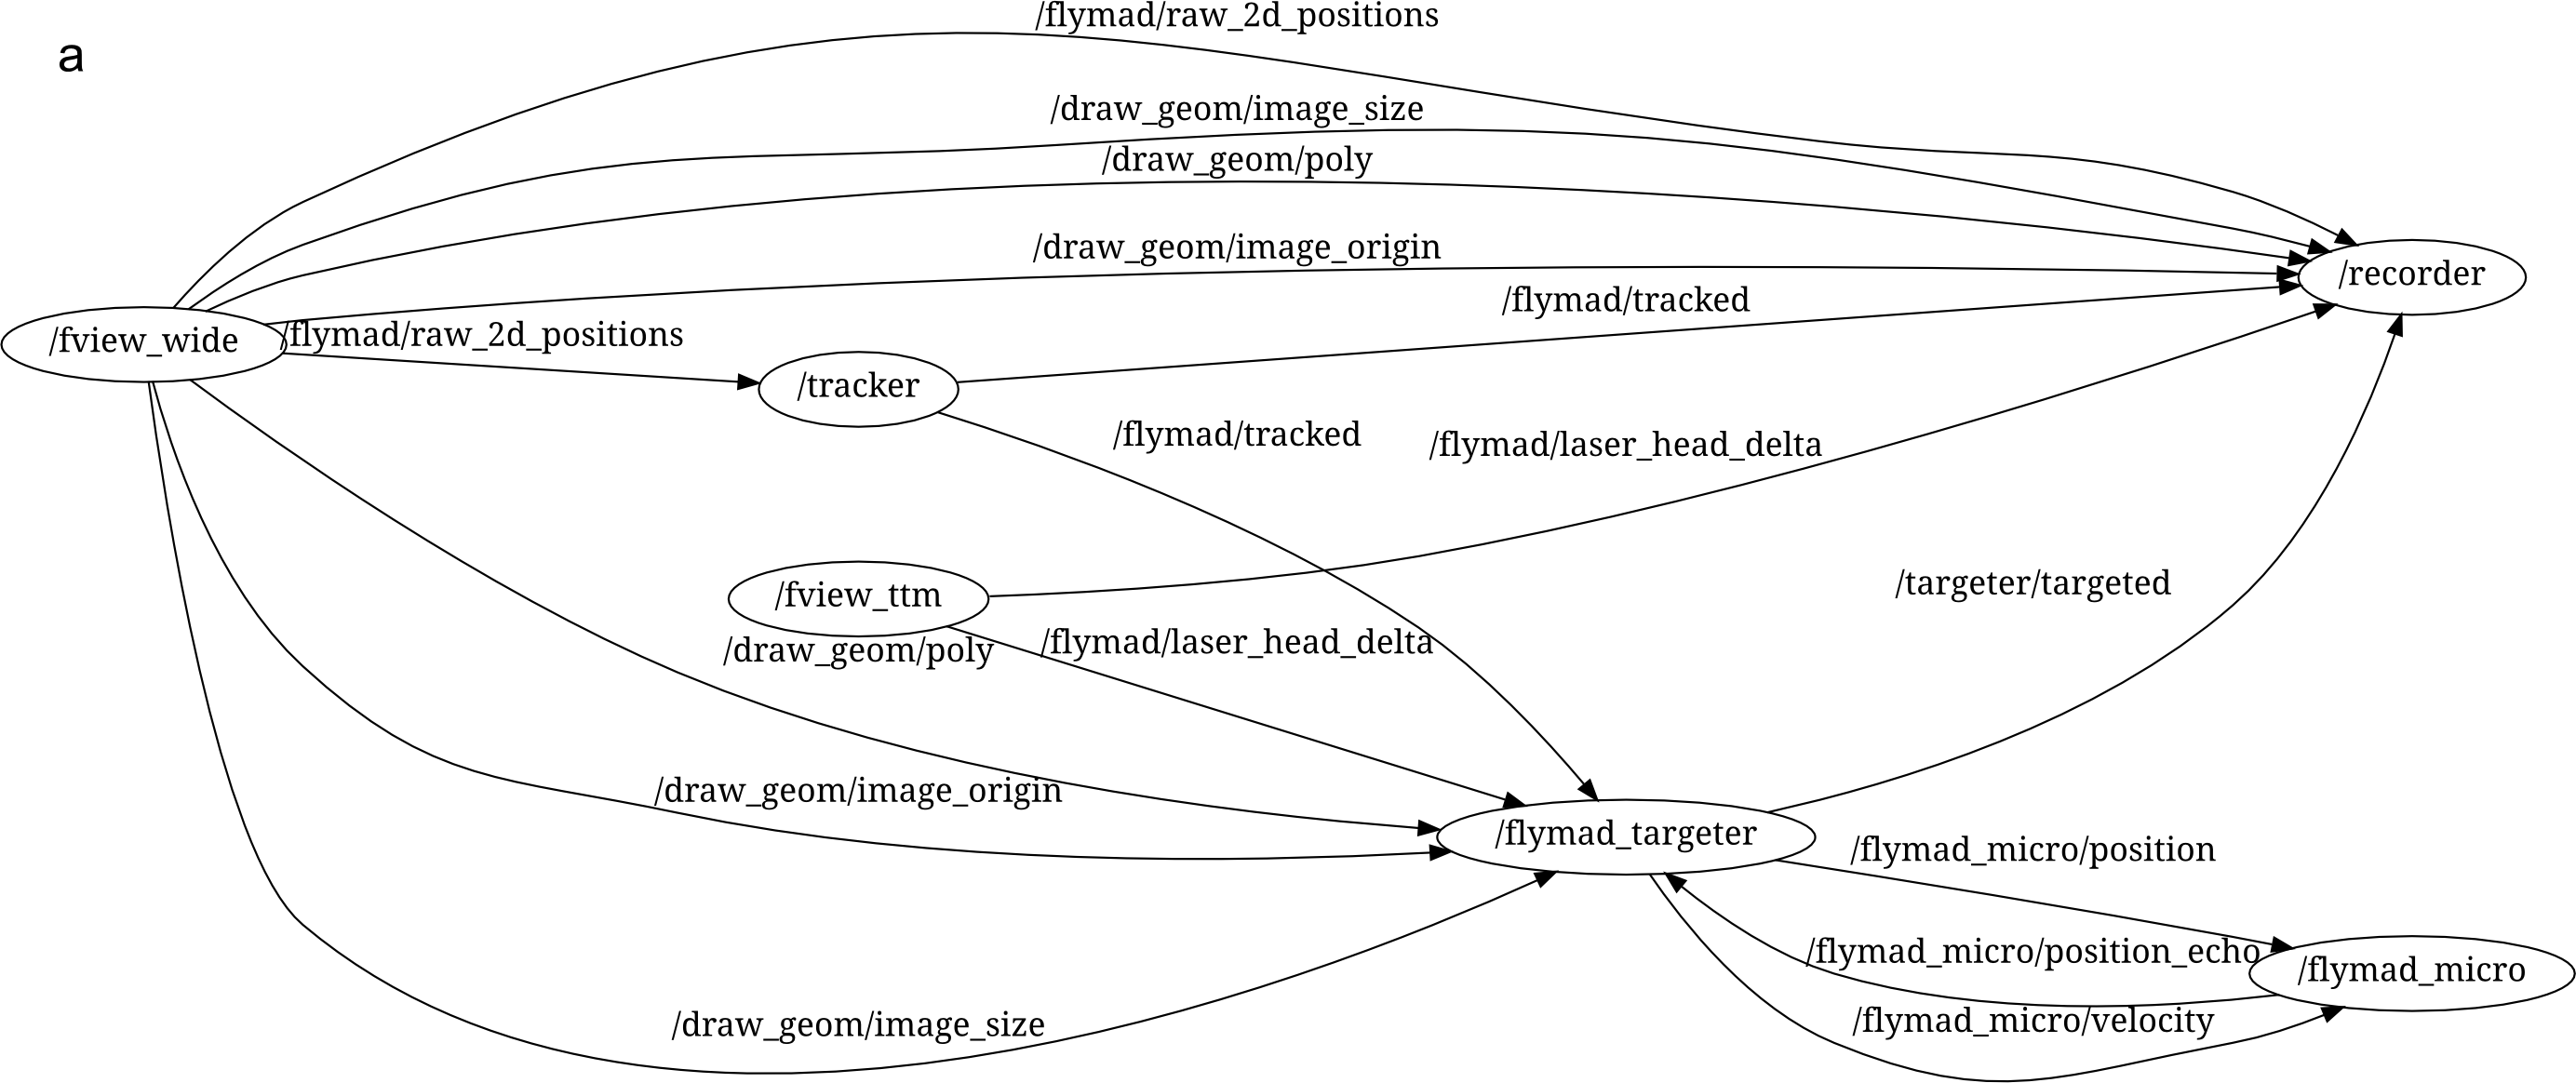
message "topics". An example of the ROS processes running during a FlyMAD
experiment can be seen below.
The lines connecting the nodes represent the flow of information across the
network, and all messages can be simultaneously recorded (see /recorder)
for analysis later. Furthermore, the isolation of the individual processes
improves robustness and defers some of the responsibility for realtime
performance from myself / Python, to the Kernel and to my overall
architecture.
For more details on ROS and on why I believe it is a good tool for
creating reliable reproducible science, see my
previous post,
my Scipy2013 video and
presentation
Image Processing
There are two image processing tasks in the system. Both are implemented as
FView
plugins and communicate with the rest of the system using ROS.
Firstly, the position of the fly (flies) in the arena, as seen by the
wide camera, must be determined. Here, a simple threshold approach is used to
find candidate points and image moments around those points are used to find the
center and slope of the fly body. A lookup table is used to point the
galvanometers in an open-loop fashion approximately at the fly.
With the fly now located in the field of view of the high magnification camera a
second real time control loop is initiated. Here, the fly body or head is detected,
and a closed loop PID controller finely adjusts the galvanometer position to achieve
maximum targeting accuracy. The accuracy of this through the mirror (TTM) system asymptotically
approaches 200μm and at 50 msec from onset the accuracy of head detection is 400 ± 200 μm.
From onset of TTM mode, considering other latencies in the system (gigabit ethernet, 5 ms,
USB delay, 4 ms, galvanometer response time, 7 ms, image processing 8ms, and image
acquisition time, 5-13 ms) total 32 ms, this shows the real time
targeting stabilises after 2-3 frames and comfortably operates at better than 120 frames
per second.
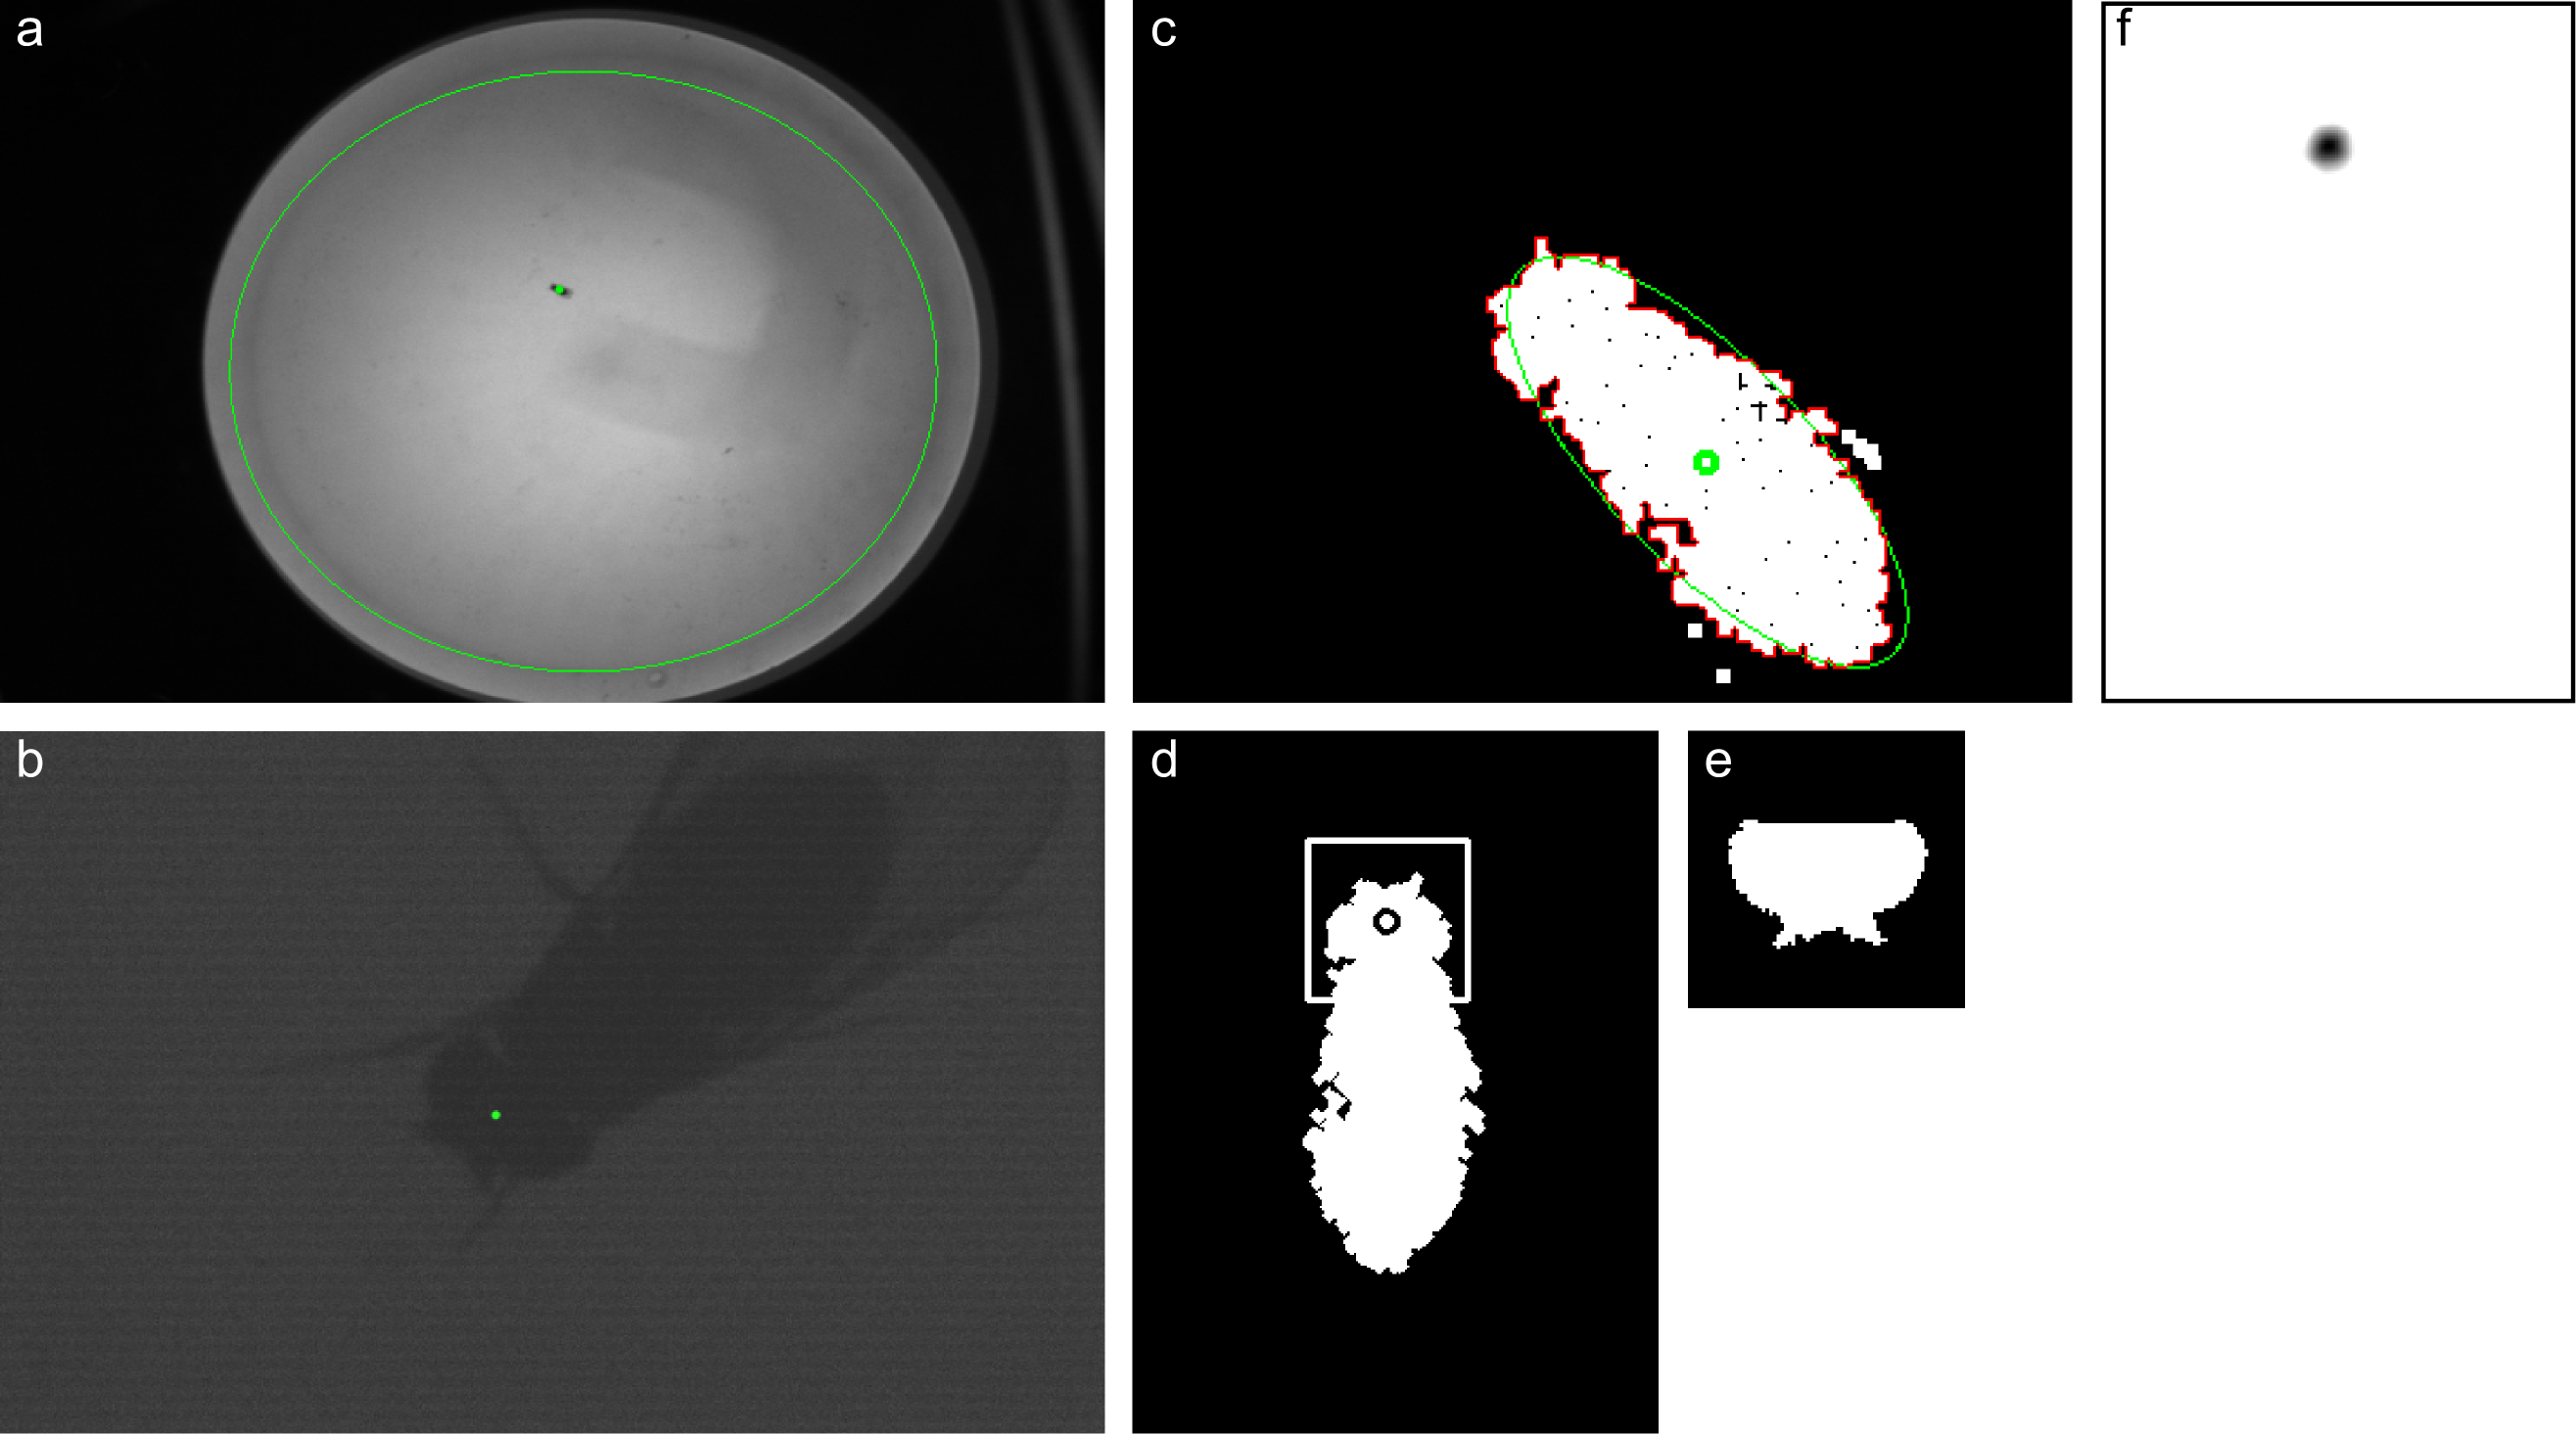
To reliably track freely walking flies, the head and body step image processing
operations must take less than 8ms. Somewhat frustratingly, a traditional template
matching strategy worked best. On the binarized, filtered image, the largest contour
is detected (c, red). Using an ellipse fit to the contour points (c,green), the contour
is rotated into an upright orientation (d). A template of the fly (e) is compared with the
fly in both orientations and the best match is taken.
I mention the template strategy as being disappointing only because I spent considerable time
evaluating newer, shinier, feature based approaches and could not achieve the closed loop
performance I needed. While the newer descriptors, BRISK, FREAK, ORB were faster than the previous
class, nether (in total) were significantly more reliable considering changes in illumination than
SURF - which could not meet the <8ms deadline reliably. I also spent considerable time testing
edge based (binary) descriptors such as edgelets, or edge based (gradient) approaches such as
dominant orientation templates or gradient response maps. The most promising of this class was local
shape context descriptors, but I also could not get the runtime below 8ms. Furthermore, one advantage
of the contour based template matching strategy I implemented, was that graceful degradation was
possible - should a template match not be found (which occurred in <1% of frames), an estimate
of the centre of mass of the fly was still present, which still allowed degraded targeting performance.
No such graceful fallback was possible using feature correspondence based strategies.
There are two implementations of the template match operation - GPU and CPU based. The CPU matcher
uses the python OpenCV bindings (and numpy in places), the GPU matcher uses cython to wrap a small
c++ library that does the same thing using OpenCV 2.4 Cuda GPU support (which is not otherwise
accessible from python). Intelligently, the python OpenCV bindings use numpy arrays to store
image data, so passing data from Python to native code is trivial and efficient.
I also gave a presentation
comparing different strategies of interfacing python with native code. The
provided source code
includes examples using python/ctypes/cython/numpy and permutations thereof.
The GPU code-path is only necessary / beneficial for very large templates and
higher resolution cameras (as used by our collaborator) and in general the CPU
implementation is used.
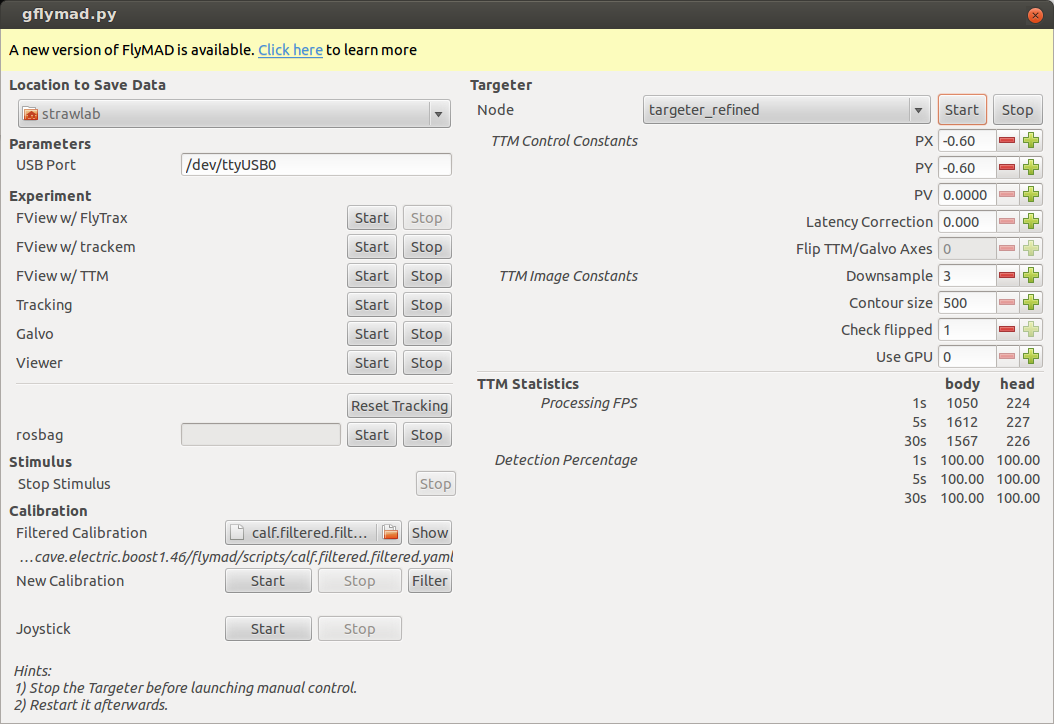
Experimental Control GUI
To make FlyMAD easier to manage and use for biologists I wrote a small GUI using
Gtk (PyGObject), and my ROS utility GUI library
rosgobject.
On the left you can see buttons for launching individual ROS nodes. On the right
are widgets for adjusting the image processing and control parameters (these
widgets display and set ROS parameters). At the bottom are realtime statistics showing
the TTM image processing performance (as published to ROS topics).
Like good ROS practice, once reliable values are found for all adjustable parameters
they can be recorded in a roslaunch file allowing the whole system to
be started with known configuration from a single command.
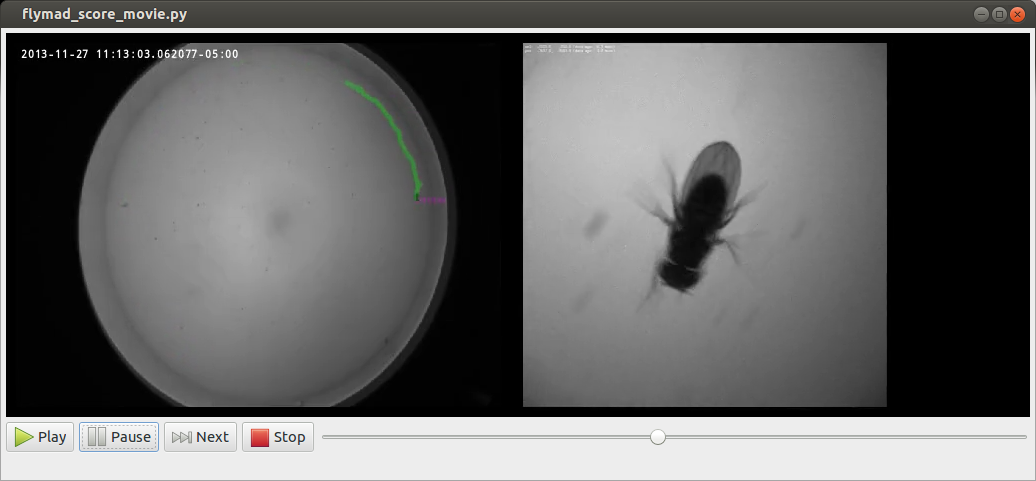
Manual Scoring of Videos
For certain experiments (such as courtship) videos recorded during the experiment
must be watched and behaviours must be manually annotated. To my surprise, no tools
exist to make this relatively common behavioural neuroscience task any easier
(and easier matters; it is not uncommon to score 10s to 100s of hours of videos).
During every experiment, RAW uncompressed videos
from both cameras are written to disk (uncompressed videos are chosen for performance reasons, because
SSDs are cheap, and because each frame can be precisely timestamped).
Additionally, rosbag files record the complete state of the experiment at
every instant in time (as described by all messages passing
between ROS nodes). After each experiment finishes, the uncompressed videos from
each camera are composited together, along with metadata such as the frame
timestamp, and a h264 encoded mp4 video is created for scoring.
After completing a full day of experiments one can then score / annotate
videos in bulk. The scorer is written in Python, uses Gtk+ and PyGObject for the
UI, and vlc.py for decoding the
video (I chose vlc due to the lack of working gstreamer PyGObject support on Ubuntu
12.04)
In addition to allowing play, pause and single frame scrubbing through the video,
pressing any of qw,as,zx,cv pairs of keys indicates that a
a behaviour has started or finished. At this instant the current video frame is
extracted from the video, and optical-character-recognition is performed on the
top left region of the frame in order to extract the timestamp. When the video
is finished, a pandas dataframe is created which contains
all original experimental rosbag data, and the manually annotated behaviour
against on a common timebase.
Distributing complex experimental software
The system was not only run by myself, but by collaborators,
and we hope in future, by others too. To make this possible we generate a single
file self installing executable using makeself,
and we only officially support one distribution - Ubuntu 12.04 LTS and x86_64.
The makeself installer performs the following steps
Adds our Debian repository to the system
Adds the official ROS Debian repository to the system
Adds our custom ROS stacks (FlyMAD from tarball and rosgobject from git)
to the ROS environment
Calls rosmake flymad to install all system dependencies and build
and non-binary ROS packages.
Creates a FlyMAD desktop file to start the software easily
We also include a version check utility in the FlyMAD GUI which notifies the user
when a newer version of the software is available.
The Results
Using FlyMAD and the architecture I have described above we created a novel system
to perform temporally and spatially precise opto and thermogenetic activation
of freely moving drosophila. To validate the system we showed distinct timing
relationships for two neuronal cell types previously linked to courtship song, and
demonstrated compatibility of the system to visual behaviour experiments.
Practically we were able to develop and simultaneously operate this complex
real-time assay in two countries. The system was conceived and built in approximately
one year using Python. FlyMAD utilises many best-in-class libraries and frameworks
in order to meet the demanding real time requirements (OpenCV, numpy, ROS).
We are proud to make the entire system available to the Drosophila community
under an open source license, and we look forward to its adoption by our peers.
For those still reading, I encourage you to view the supplementary video below,
where its operation can be seen.
In June 2013 I was lucky to speak at the fantastic SciPy2013 conference
(scientific computing with python). I spoke about a work flow and tools we have
developed at strawlab. The title of my talk
was Managing Complex Experiments, Automation, and
Analysis using Robot Operating System.
The video of that
talk is included below;
This post describes a tool I developed for
distributing ROS packages to scientific collaborators. That software is
called ros-freeze.
For those of you not aware, ROS is a great framework
traditionally targeted for robotics but usable in other fields too. In particular
it has a relatively good performance and simple, strongly typed, inter-process-communication
framework and serialization format. This is simultaneously useful for creating
distributed realtime-ish systems with comprehensive logging of the system
state. Best of all, the python interface to ROS is very clean.
Unfortunately, being a framework, ROS is rather all-or-nothing (going as
far as to describe itself as a meta-operating system). The basic ROS
install is several gigabytes, and building it yourself can be rather
difficult. Furthermore, as I mentioned in my presentation, it is attractive
to use the built in ROS tool rosbag for recording timestamped data
to disk. Unfortunately, reading these files again needs ROS,
thus necessarily coupling experimental data to the software used
to collect it.
To remedy this I wrote ros-freeze,
a python tool to convert any ROS package into a pure-python package including
all of the dependencies. Collaborators can then install the python
package and immediately have access to all the same ROS packages and libraries
without having to build the whole ROS stack.
this is currently working on ROS Electric (an old release, at work
we have chosen to stick with Ubuntu 12.04LTS)
changes for other ROS distributions might be necessary, so please get in touch
this is successfully tested on ROS packages containing tens of thousands of lines of
code and dozens of ROS dependencies.
although recent ROS releases have improved the package management situation (by embracing
deb packaging, yay!) this tool provides an unprecedentedly easy way to distribute your
pure python ROS applications
A Pure Python ROS Distribution?
One side effect of this was the packaging of the pure python ROS core as an easily installable
python egg. This means that you can write, debug and test python ROS nodes without having to
install the whole ROS distribution.
One can even go as far as running rosmaster and the command line tools
(rosnode, rosparam, etc)!
Lately I have been writing a lot of native code against multiple OpenCV
versions. Like many Linux developers I tend to keep different development prefixes
isolated using LD_LIBRARY_PATH (and friends).
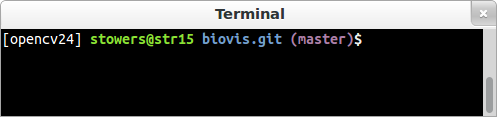
I recently took the time to clean up a little script I use for this
purpose, and posted it online. Inspired by virtualenv, it now has a prompt!
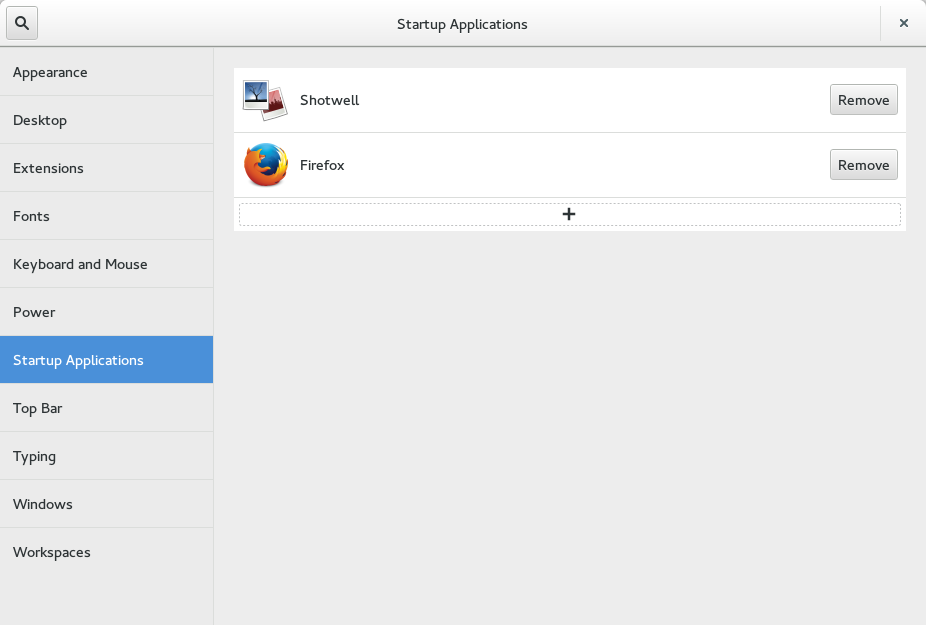
In collaboration with GSOC student Alex Muñoz
and designer Allan Day, GNOME Tweak Tool has
seen many improvements this cycle, both 'under the hood', and most noticeably,
in the form of a modern GNOME3 UI
design.
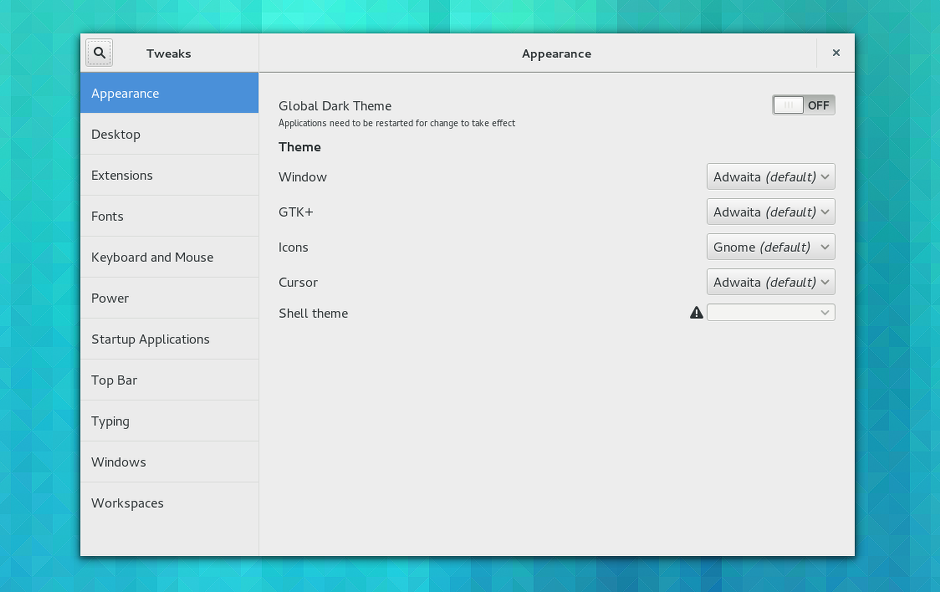
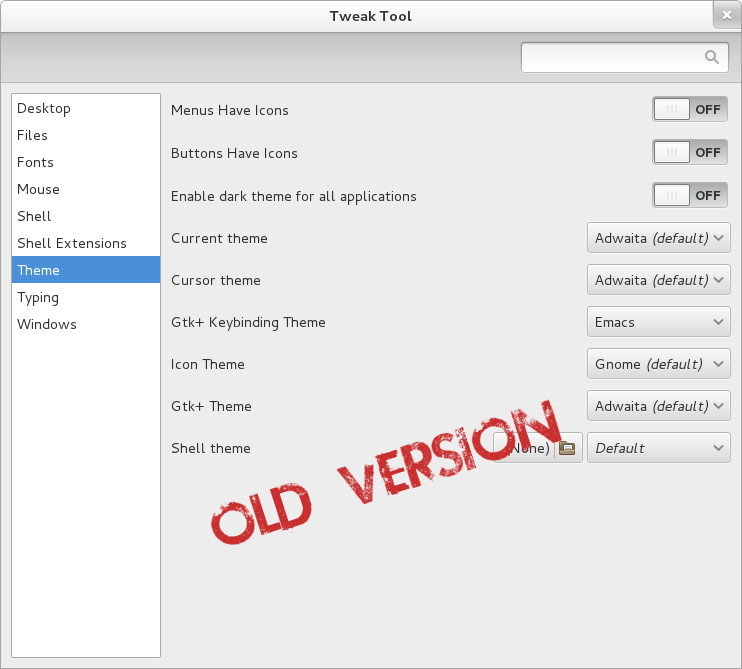
The difference is stark; compare the old and the new versions below;
In addition to the use of new widgets (Gtk.HeaderBar, Gtk.Application,
Gtk.Stack, Gtk.SearchBar) the organisation of tweaks into categories
has been updated. This should make many
settings easier to find, especially in conjunction with new translations for many
tweak names and descriptions.
Historically, the tweak tool UI was mostly auto-generated, resulting in a rather
uniform and boring look, and more importantly the inability to easily group tweaks
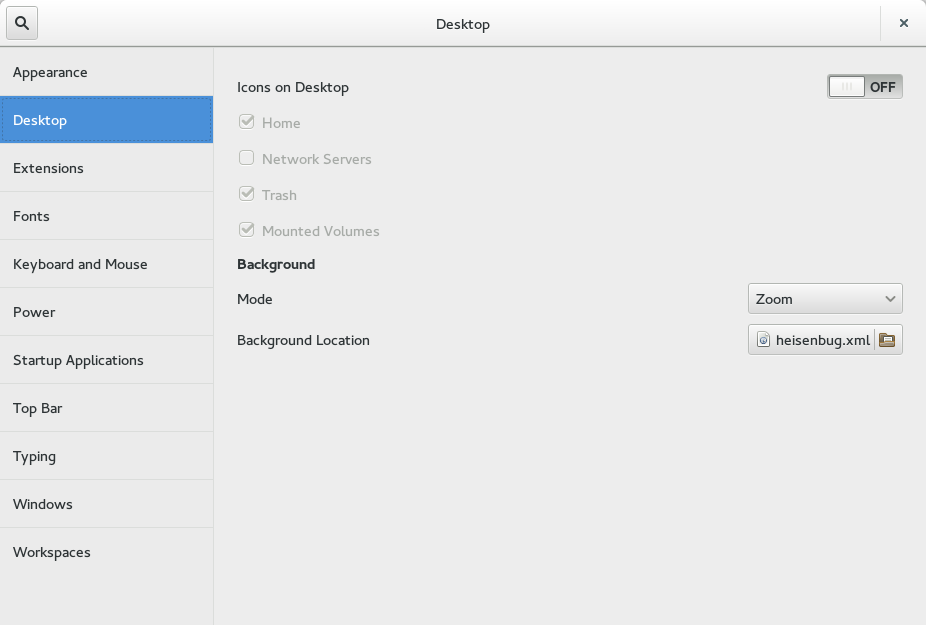
together to show causality (such as turning off desktop icons makes the options
to show specific types of icons on the desktop redundant). This architectural
limitation has now been fixed, and in addition, specialized UI elements have
been created for certain tweaks; startup applications, shell extensions,
desktop icons, the shell top bar, etc.
Other highlights of 3.10 include;
Allow updating GNOME Shell extensions from inside tweak tool
Startup application management
Offer to logout user when tweaks require the session restarted
GNOME style sidebar and search
Ability to disable middle-click paste (great for designers!)
Show text in tooltip when label is ellipsized, and make window maximizable and
resizable.
Better tweak names and descriptions (manage our own translations
instead of getting all from gsettings)
Unfortunately, not all features I wanted to implement were completed. Things I will
be working on in 3.12 include;
Hidpi tweak (this will land in 3.10.1)
Better search interaction (focus stealing and search-results layout fixes)
Improved layout when the window is maximized
Resurrect the wacom panel (this was generously contributed at the start of the
cycle, but I had no time to port it to the new design, nor any way to test it)
Privileged helper for operations requiring root permissions (power management
options, installing system wide themes)
The main limitation of the current implementation is that is only supports
the PointXYZ point type. PCL is a heavily optimized and templated API,
and the best method for creating specializations correspoinding to the correct point type
in a dynamic language like Python is not clear.
Nevertheless, the binding is already capable of smoothing, filtering and
the fitting of geometries in arbitary 3D point cloud data.
The binding is written using Cython, and is one of the more complex C++
bindings I could find.
The current release has been tested with
pcl 1.5.1
Cython 0.16
although it should work with more recent releases.
I would be interested in adressing the specialization issues using the recently
added and improved
fused types support in Cython.
This work has been supported by, and is currently in production use at,
Strawlab.
At the lab in which I work (Andrew Straw, strawlab) we
study the visual flight behaviour of Drosophila using virtual reality. The
implementation of this will be explained in future posts and papers however for
this post I am going to describe how I used Gtk1 and
ROS to build an interface to control and monitor
running experiments (called the 'Operator Console').
A future post will address and release all the ROS+GObject2 glue that lets these
interfaces scale dynamically as nodes (dis)appear. This just shows the relevant
Gtk parts and has some comments on what I would like from Gtk to make these
sort of interfaces easier.
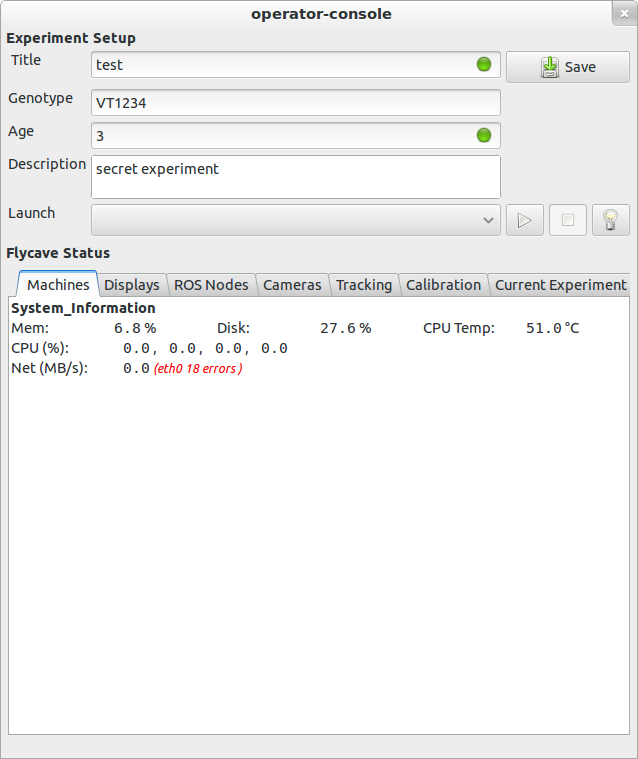
The screenshow shows the first tab of the 'Operator Console'3.
Implementation Notes
I use the secondary icon support of Gtk.Entry to show the contents contain
sensible data. Maybe validation support in Gtk would be useful here
bug.
The 'Description' entry is a Gtk.TextView, not a Gtk.Entry. It was necessary
to apply custom CSS to make it look reasonably similar. Sadly, it does not
support the full/same set of CSS properties as Gtk.Entry, so it was impossible
to show the same border radius and focus colors
bug. Perhaps a multi-line
Gtk.Entry would be better.
The bottom half of the window shows the utilisation of all computers. I tried
a few versions of this, and simple sensibly formatted monospaced text looked
much better than anything else I tried. Any suggestions?
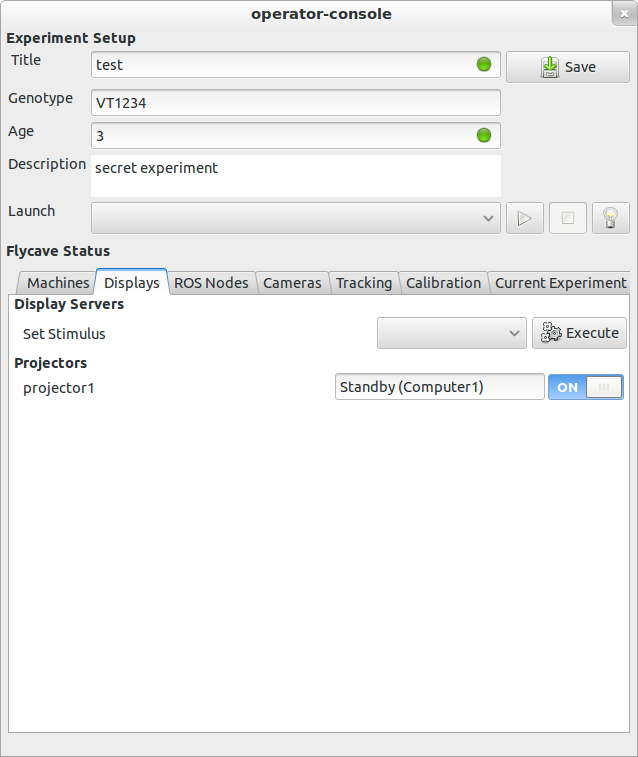
This screenshot shows an example screen where we mix the control and monitoring
or many instances of the same ROS node.
Implementation Notes
The Gtk.Switch simultainously displays the status of the projector, and also
allows control of the node. The is a common use-case in the software, and
due to the asynchronous nature of the ROS messages, I need to distinguish these
from user-generated signals. I have wrappers such as the following
for many widgets4. Advice on how to distinguish this use-case would be
preferred.
The "Standby (Computer1)" is for display only and mirrors the status of a ROS
topic. I would like some way visually to inicate that this widget is not actually
an editable Gtk.Entry. Currently the Gtk.Entry is set
editable = False, it looks to out of place with sensitive = False.
Perhaps I should add some custom CSS to color it slightly different.
Suggestions are appreciated.
Closing Remarks
I'm really happy with the status of the PyGObject bindings. We have a few quite
large applications built using them (and ROS) and I have no complaints about
performance5 or otherwise. The conventional wisdom was that PyGTK (and GTK) were
not suitable for threaded workloads but the threading model of ROS guarentees that
the 'operator-console' shown above manages upwards of 50 background threads asynchronously
updating the GUI state.
Actually PyGObject, argh why didn't we keep the name as pygtk? ↩
I'll blog about this later. For the curious,
rosgobject lives here. ↩
In real operation this GUI shows the state of many more
machines/nodes/computers. This screenshot is running on my laptop because
showing too much more might give away the game ;-). ↩
freeze_notify and thaw_notify would almost work, if the events
could be dropped and not queued. Also, not all widgets use notify::active,
GtkComboBox(Text) for example. A general way to do this would be preferred. ↩
Excluding plotting / graphing performace. But that is fodder for a later post. ↩
An organised person would have blogged about going to GUADEC before the event started. I am not that person. I am there now. Come see me if you want to talk about / hack on
GNOME tweak tool
Scientific computing with PyGObject (improving interaction with numpy, etc)
2011 has been an interesting year. Between the stupid earthquakes and the pressure of finishing my PhD, I have been silent because I have had nothing interesting to talk about (cf. twitter...).
But there is a light at the end, I'm on track to complete my thesis, 'Biologically Inspired Visual Control of Flying Robots', in December/January.
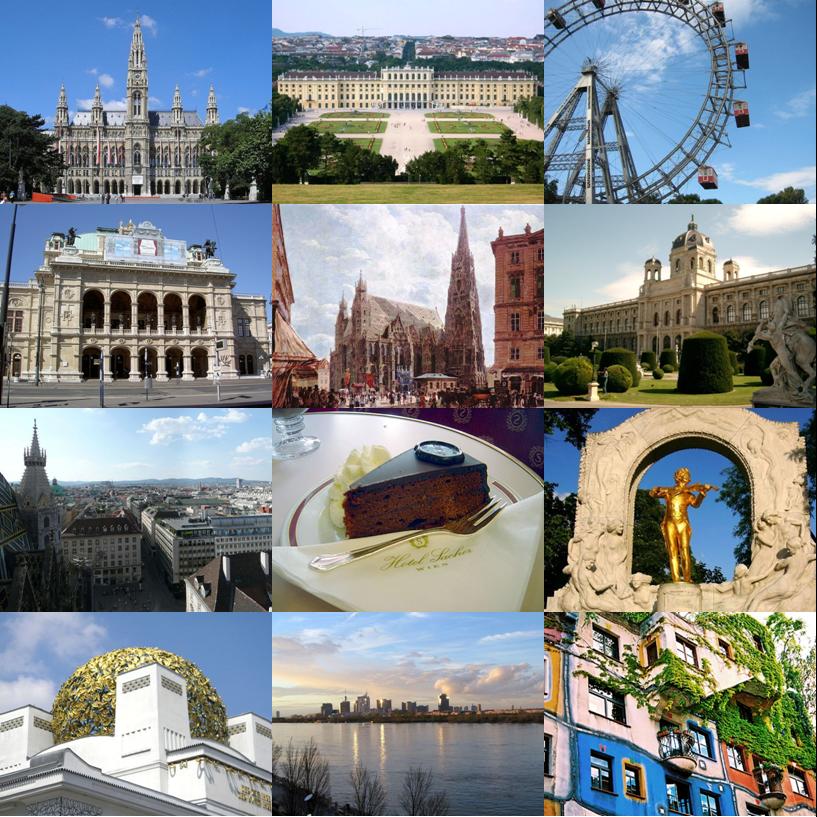
I'm excited to say that I have accepted a job at the Institute of Molecular pathology, in a research group studying the mechanisms of visual flight control in insects. Technology wise, it is a perfect fit; the experimental apparatus involves a multi-camera real-time flight tracking system and estimator for multiple targets in an augmented reality flight arena. It is open-source (ish), and python/numpy. Research wise, it allows me to investigate some of the assumptions and unknowns in the biomimetic control systems I implemented during my PhD. And it is in Vienna, 1st Feb, 2012!
This is a career change for me. In the last few years it became increasingly clear that I was morally uncomfortable with the use of UAVs as weapons (drones). Previously I had consoled myself with there existing an ethical and philosophical difference between 'the application of research' and 'the action of research'. When It came to looking for work, and considering who to work for, this difference was often eroded.
It has also been particularly frustrating being in New Zealand for the last 12 months and watching our flaccid national response to the three recent challenges here (world cup, earthquake, rena oil spill).
Technology Tidbits
gnome-tweak-tool is coming along nicely. I have some things in bugzilla to address, but I am happy with the state and direction.
GNOME 3 has helped my productivity greatly, maximized windows, keyboard navigation and less distractions have been welcome changes.
Pygtk is in maintenance mode (I need it to keep working for some of my UAV code). python-gobject and gobject-introspection are awesome and easy ways to write new GNOME apps.
I was recently asked to help a colleague access his image processing C-library from python; quite a common task. As those of you who are familiar with Python might realise, there are a whole bag of ways that this can be accomplished;
In this case the colleague only needed to access a single function from the library returning image data, and then hand this result onto OpenCV. One happy side effect of the new (> v2.1) python-opencv bindings is that they do no validation on CvImage.SetData, which means you can pass an arbitrary string/pointer. Because of this I advised him I thought using something like SWIG was overkill, and he could just write a wrapper to his library using ctypes, or a thin python extension directly.
Image data contains embedded NULLs, and I could not find a concise example of dealing with non null-terminated, non-string char * arrays via ctypes so I wrote one.
The full code can be found here and contains examples showing how to deal with data of this type using ctypes, and by writing a simple python extension linking with the library in question.